|

|
Piston Diagnostics
|
[The Navigation Bar feature is not available in this web]
These pictures and descriptions are by Eric Gorr and
were taken from an Australian dirtbike website, which appears to
no longer exist. I have had these "on file" for some
time and I publish them, with thanks, unchanged.
|
The process of examining a used piston can tell a mechanic
helpful information on the condition of an engine. When an engine
failure occurs, the piston is likely to take the brunt of the
damage. A careful examination of the piston can help a mechanic
trace the source of a mechanical or tuning problem. This technical
article serves as a guide for the most common mechanical problems
that plague engines.
|
|
|
PERFECT BROWN CROWN
The crown of this piston shows an ideal carbon pattern. The
transfer ports of this two-stroke engine are flowing equally and
the colour of the carbon pattern is chocolate brown. That
indicates that this engine's carb is jetted correctly.
|

|
|
|
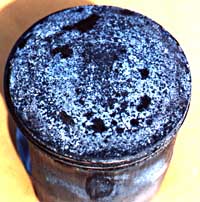
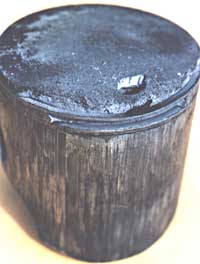
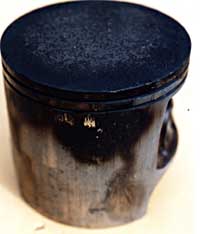
BLACK SPOT HOT
The underside of this piston has a black spot. The black spot
is a carbon deposit that resulted from pre-mix oil burning on to
the piston because the piston's crown was too hot. The main
reasons for this problem are overheating due to too lean carb
jetting or coolant system failure.
|
|
|
|
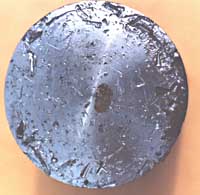
ASH TRASH
This piston crown has an ash colour, which shows that the
engine has run hot. The ash colour is actually piston material
that has started to flash (melt) and turned to tiny flakes. If
this engine was run any longer, it probably would've developed a
hot spot and hole near the exhaust side and failed. The main
causes of this problem are too lean carb jetting, too hot spark
plug range, too far advanced ignition timing, too much compression
for the fuel's octane, or a general overheating problem.
|
|
|
|
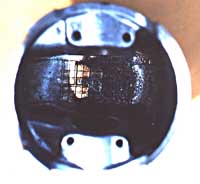
SMASHED DEBRIS
This piston crown has been damaged because debris entered the
combustion chamber and was crushed between the piston and the
cylinder head. This engine had a corresponding damage pattern on
the head's squish band. The common causes of this problem are
broken needle bearings from the small or big end bearings of the
connecting rod, broken ring ends, or a dislodged ring centring
pin. When A problem like this occurs, its important to locate
where the debris originated. Also the crankcases must be flushed
out to remove any left over debris that could cause the same
damage again. If the debris originated from the big end of the
connecting rod, then the crankshaft should be replaced along with
the main bearings and seals.
|
|
|
|
CHIPPED CROWN DROWNED
This piston crown chipped at the top ring groove because of a
head gasket leak. The coolant is drawn into the combustion chamber
on the down-stroke of the piston. When the coolant hits the piston
crown it makes the aluminium brittle and it eventually cracks. In
extreme cases the head gasket leak can cause erosion at the top
edge of the cylinder and the corresponding area of the head. Minor
leaks of the gasket or o-ring appear as black spots across the
gasket surface. An engine that suffers from coolant being
pressurized and forced out of the radiator cap's vent tube, is a
strong indication of a head gasket leak. In most cases the top of
the cylinder and the face of the cylinder head must be resurfaced
when a leak occurs. Most mx bikes have head stays mounting the
head to the frame. Over time the head can become warped near the
head stay mounting tab, because of the forces transferred through
the frame from the top shock mount. It's important to check for
warpage of the head every time you rebuild the top end.
|

|
|
|
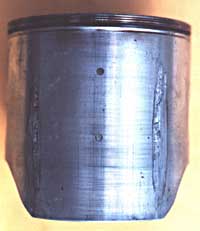
SHATTERED SKIRT
The skirts of this piston shattered because the piston to
cylinder clearance was too great. When the piston is allowed to
rattle in the cylinder bore, it develops stress cracks and
eventually shatters.
|

|
|
|
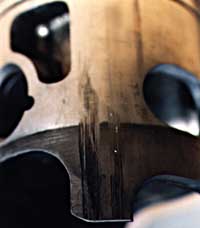
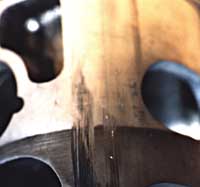
SNAPPED ROD
The connecting rod of this engine snapped in half because the
clearance between the rod and the thrust washers of the big end
was too great. When the big end bearing wears out, the radial
deflection of the rod becomes excessive and the rod suffers from
torsion vibration. This leads to connecting rod breakage and
catastrophic engine damage. The big end clearance should be
checked every time you rebuild the top end. To check the side
clearance of the connecting rod, insert a feeler gauge between the
rod and a thrust washer. Check the maximum wear limits in your
engine's factory service manual.
|

|
|
|
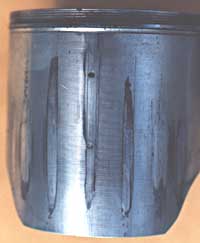
FOUR-CORNER SEIZURE
This piston has vertical seizure marks at four equally spaced
points around the circumference. A four-corner seizure is caused
when the piston expands faster than the cylinder and the clearance
between the piston and cylinder is reduced. Another common problem
of this type is a single point seizure on the centre of the
exhaust side of the piston. However this occurs only on cylinders
with bridged exhaust ports. The main causes for this problem are
too quick warm-up, too lean carb jetting (main jet), or too hot of
a spark plug range.
|
|
|
|
MULTI-POINT SEIZURE
This piston has many vertical seizure marks around the
circumference. This cylinder was bored to a diameter that was too
small for the piston. As soon as the engine started and the piston
started its thermal expansion, the piston pressed up against the
cylinder walls and seized. The optimum piston to cylinder wall
clearances for different types of cylinders vary greatly. For
example a 50cc composite plated cylinder can use a piston to
cylinder wall clearance of .0015 inches, whereas a 1200cc
steel-sleeved cylinder snowmobile set-up for grass drags will need
between .0055 to .0075 inches. For the best recommendation on the
optimum piston to cylinder clearance for your engine, look to the
specs that come packaged with the piston or consult your factory
service manual.
|
|
|
|
INTAKE SIDE SEIZURE
This piston was seized on the intake side. This is very
uncommon and is caused by only one thing, loss of lubrication.
There are three possible causes for loss of lubrication, no
pre-mix oil, separation of the fuel and pre-mix oil in the fuel
tank, water passed through the air-filter and washed the oil film
off the piston skirt.
|
|
|
|
COMPOSITE FLAKING
Most two-stroke cylinders used on motorcycles and snowmobiles,
have composite plated cylinders. The composite material is made of
tiny silicon carbide particles. The electro-plating process
enables the silicon carbide particles to bond to the cylinder
wall. The particles are very hard and sharp, they don't bond to
the ports so the manufacturer or reconditioning specialist must
thoroughly clean the cylinder. Sometimes the silicon carbide
"flashing" breaks loose from the ports and becomes
wedged between the cylinder and the piston. This causes tiny
vertical scratches in the piston. This problem isn't necessarily
dangerous and doesn't cause catastrophic piston failure, but it
should be addressed by thoroughly flushing the cylinder and
ball-honing the bore to redefine the cross-hatching marks.
Normally you will need to replace the piston kit because the
scratches will reduce the piston's diameter beyond the wear spec.
|
|
|
|
BURNT-OUT BLOW-HOLE
This piston was overheated so badly that a hole melted through
the crown and collapsed the ring grooves on the exhaust side.
Normally the piston temperature is higher on the exhaust side so
catastrophic problems will appear there first. There are several
reasons for a failure like this, here are the most common;
air-leak at the magneto side crankshaft seal, too lean carb
jetting, too far advanced ignition timing or faulty igniter box,
too hot of a spark plug range, too high of a compression ratio,
too low octane fuel.
|
|
|
|
BLOW-BY
This piston didn't fail in operation but it does show the most
common problem, blow-by. The rings were worn past the maximum ring
end gap spec, allowing combustion pressure to seep past the rings
and down the piston skirt causing a distinct carbon pattern. Its
possible that the cylinder walls cross-hatched honing pattern is
partly to blame. If the cylinder walls are glazed or worn too far,
even new rings won't seal properly to prevent a blow-by problem.
Flex-Hones is a product available at most auto parts stores. They
can be used to remove oil glazing and restore cross-hatch honing
marks that enable the rings to wear to the cylinder and form a
good seal. If you purchase a Flex-Hone for your cylinder, the
proper grit is 240 and the size should be 10% smaller than the
bore diameter.
|
|
|
11 TIPS FOR REBUILDING A TWO-STROKE TOP END
- Before
you disassemble your engine, power-wash the engine and the
rest of the vehicle. That will reduce the risk of dirt and
debris falling into the engine. Once you remove the cylinder,
stuff a clean rag down into the crankcases.
- The
cylinder and head use alignment pins to hold them straight in
position from the crankcases on up. The pins make it difficult
to remove the cylinder from the cases and the head from the
cylinder. Sometimes the steel alignment pins corrode into the
aluminium engine components. Try spraying penetrating-oil down
the mounting studs before attempting to remove the cylinder
and head. Never use a flat-blade screwdriver, chisel, or metal
hammer to remove the cylinder. Instead use this technique; buy
a lead-shot plastic mallet, swing it at a 45-degree angle
upwards against the sides of the cylinder. Alternate from left
to right, hitting the sides of the cylinder to separate it
from the cases evenly. Clean the steel alignment pins with
steel wool and penetrating-oil. Examine the pins closely. If
they are deformed in shape, they won't allow the engine parts
to bolt together tightly. This can cause a dangerous air leak
or a coolant leak. The pins are cheap at about $2 each.
Replace them if they're rusty or deformed.
- Never
re-use old gaskets. Remove them with a razor blade or gasket
scraper. Don't use a drill-driven steel wool type pad to
remove old gaskets because they can remove aluminium from the
cylinder and head. That will cause a gasket to leak.
- Always
check the ring end gap on a new ring by placing it in the
cylinder between the head gasket surface and the exhaust port.
The gap should be between .012 to .024 inches.
- Always
install the circlips with the opening facing straight up or
down, that way inertia will hold it tight into the clip
groove. Place one clip in the groove before installing the
piston on the connecting rod. Its easier to install a clip
with the piston in your hand rather than on the rod. There
also less chance that you'll drop the circlip in the
crankcases.
- Always
install the rings on the piston with the markings facing up.
Coat the rings with pre-mix oil so they can slide in the
groove when trying to install the piston in the cylinder.
- Always
install the piston on the connecting rod with the arrow on the
piston crown facing towards the exhaust port.
- The
traditional way to assemble the top end is to install the
piston assembly on the connecting rod, compress the rings, and
slide the cylinder over the piston. That can be difficult with
larger bore cylinders, or if you're working by yourself. Try
this method instead. Install one circlip in the piston,
install the piston into the cylinder with the pin hole
exposed, install the piston pin through one side of the
piston, position the cylinder over the connecting rod and push
the piston pin through until it bottoms against the circlip,
install the other circlip. It only takes two hands to install
the top end using this manor and there is less chance that
you'll damage the rings by twisting the cylinder upon
installation.
- On
cylinders with reed valves and large oval intake ports, take
care when installing the piston assembly in the cylinder
because the rings are likely to squeeze out of the ring
grooves. Use a flat-blade screwdriver to gently push the rings
back in the grooves so the piston assembly can pass by the
intake port.
- For
steel head gaskets, place the round side of the
"bump" facing up. Don't use liquid gasket sealer,
use aerosol spray adhesive types instead. For hybrid fibre/steel
ring head gaskets, place the wide side of the steel rings
facing down.
- When
you initially start the engine after a rebuild, manipulate the
choke to keep the engine rpm relatively low. Once the engine
is warm enough to take it off choke, drive the vehicle around
on flat hard ground. Keep it under 2/3 throttle for the first
30 minutes. Two common myths for proper engine break-in are:
- Set
the engine at a fast idle, stationary on a stand.
- Add
extra pre-mix oil to the fuel.
When the engine is on a stand it doesn't have any air passing
through the radiator and it is in danger of running too hot. When
you add extra oil to the fuel you are effectively leaning the carb
jetting. This can make the engine run hotter and seize.
|
Back
to Top
|